

Introduction

Whether you’re a coffee enthusiast or simply enjoy a delicious latte, making them at home offers a rewarding experience. While the latte has a rich history intertwined with the evolution of espresso, crafting your own perfect cup allows you to control every element and savor the results. This guide will walk you through the essential steps involved: preparing a rich espresso base, achieving creamy frothed milk, and assembling the latte for a delightful coffee creation.
What is a Latte
The latte, short for “caffè latte” in Italian, is a beloved coffee drink enjoyed worldwide. Its origins trace back to Italy, and it has become a staple in cafes everywhere. The term “latte” itself translates to “milk,” hinting at its core characteristic: a smooth and creamy coffee experience.
A traditional latte consists of a shot of espresso, steamed milk, and a small amount of foam on top. The ratio of espresso to steamed milk can vary depending on personal preference and regional customs, but it typically ranges from 1:3 to 1:5.
A traditional latte is unflavored, but feel free to unleash your inner barista! Adding syrups like vanilla, caramel, hazelnut, or other flavors is perfectly acceptable and widely practiced. You can even experiment with spices like cinnamon or nutmeg for a unique twist.
Understanding the Ingredients
Espresso: The Soulful Foundation

- Quality Matters: Freshness reigns supreme, start with high-quality, freshly roasted coffee beans. The espresso’s flavor profile depends heavily on the bean type, origin, and roast. Explore different beans to discover your favorites: a bold Robusta blend for a powerful kick or a nuanced Arabica for a more delicate flavor.
- Brewing Methods: The classic approach utilizes an espresso machine. It forces hot water through finely-ground coffee at high pressure, extracting a concentrated shot. Alternative methods like stovetop Moka pots or AeroPress can also achieve a decent espresso-like brew, perfect for home experimentation.
- The Golden Ratio of Time: Aim for a balanced extraction time of around 25-30 seconds. This sweet spot ensures you extract the full flavor potential without venturing into bitter territory. Over-extraction is the enemy of a delicious espresso.
- Grind Size: For optimal extraction, use a fine grind. This increases the surface area of the coffee grounds, allowing for optimal hot water contact within the short brew time. Experiment with grind size adjustments to achieve that perfect 25-30 second extraction window.
- Tamping Pressure: Consistency is Key: Consistent tamping pressure ensures even water distribution throughout the coffee grounds, leading to a balanced and flavorful espresso shot. Aim for around 30 pounds of pressure when tamping the grounds in the portafilter. Uneven pressure can result in an uneven extraction, leading to a sour or bitter taste.
Milk: The Creamy Embrace

- Dairy or Dairy-Free: The Choice is Yours: Traditionally, lattes utilize whole milk for its richness and creamy texture. However, with the rise of dietary restrictions and preferences, various alternative milk options have emerged: soy, almond, oat, coconut milk, and more! Each offers a unique flavor profile and texture. Experiment to discover what suits your taste and dietary needs.
- Temperature Control: Hitting the Sweet Spot: The ideal temperature range for milk steaming is around 140-150°F (60-65°C). This ensures the milk is hot enough to enhance the espresso’s flavor without scalding it. Scalded milk can impart a burnt taste to your latte, ruining the delicate balance.
- The Art of Microfoam: For a velvety smooth texture, strive to achieve microfoam. This consists of tiny, uniform air bubbles that create a luxurious mouthfeel. Avoid large, coarse bubbles or overheated milk, as they can result in a frothy or burnt-tasting latte. Mastering the art of milk frothing with a steam wand or milk frother takes practice, but the reward is a truly decadent latte.
Optional Flavors and Syrups

- Customization Cravings: Unleash your inner barista! Incorporate flavored syrups like vanilla, caramel, hazelnut, or chocolate to personalize your latte. These syrups can be added directly to the milk before steaming (for a more subtle flavor) or drizzled on top of the finished latte for a more pronounced taste.
- Sugar Alternatives: Sweetness with a Twist: Health-conscious coffee aficionados can explore natural sweeteners like honey, maple syrup, or agave nectar for a healthier alternative to traditional sugar syrups. Experiment with different options to find your perfect level of sweetness.
- Spices and Extracts: A Touch of Magic: Elevate your latte beyond the ordinary with spices! A sprinkle of cinnamon, nutmeg, or cardamom can add warmth and depth. For a refreshing twist, consider a few drops of peppermint or almond extract. These subtle additions can truly transform your latte into a unique and delightful creation.
Equipment You’ll Need: Brewing Up Your Latte Dreams
Now that we’ve explored the essential ingredients, let’s delve into the equipment that will bring your latte dreams to life. The good news is, you have options – from high-tech espresso machines to ingenious at-home alternatives.
Choosing Your Espresso Weapon
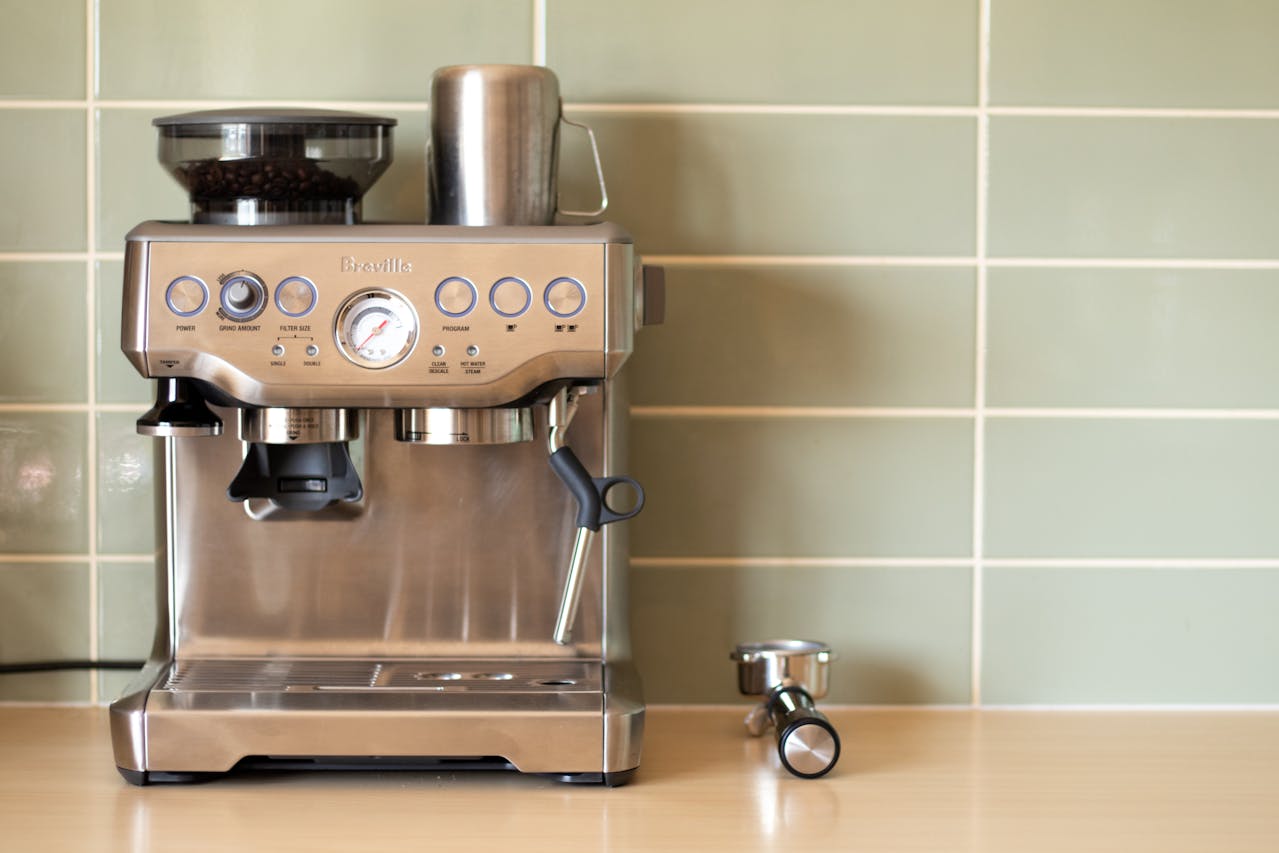
Espresso Machine: The Barista’s Best Friend: For the serious latte enthusiast, an espresso machine reigns supreme. These machines offer precise control over pressure, temperature, and water flow, resulting in consistent and delicious espresso shots. With manual, semi-automatic, and fully automatic options available, you can choose the level of involvement that suits your preference.
Stovetop Moka Pot: This iconic Italian device, the Moka pot, might not be a true espresso machine, but it’s a beloved classic for strong coffee lovers. It brews a bold and flavorful coffee concentrate, perfect for lattes and other milk coffee drinks. While it uses steam pressure similar to espresso, it operates at a lower pressure, resulting in a slightly different, often bolder taste. This makes it a fantastic and affordable alternative for crafting delicious lattes at home!
AeroPress: The Budget-Friendly Powerhouse: Don’t be fooled by its size! This versatile and portable coffee maker utilizes air pressure to brew a concentrated coffee similar to espresso. It’s a fantastic budget-friendly option for whipping up latte-worthy coffee at home, especially if you don’t have an espresso machine readily available.
Milk frother or steam wand
Next up: transforming your milk into a luxurious blanket of foam!
Milk Frother: For those seeking a hassle-free approach, a standalone milk frother is your knight in shining armor. These electric marvels utilize whisking action to create frothed milk for your lattes. They come in various designs, from handheld wands to countertop units, allowing you to choose the one that best suits your needs and kitchen space.
Steam Wand: If you crave ultimate control over milk temperature and texture, a steam wand – usually found on most espresso machines – is your ideal partner. Mastering the art of steam wand frothing takes practice, but the reward is the ability to create silky smooth microfoam, the hallmark of a truly exceptional latte.
Bean Basics: Selecting the Perfect Roast

The foundation of a fantastic latte lies in the quality of your coffee beans. Here are some key considerations to ensure your latte sings with flavor:
Freshness is King: Always prioritize freshly roasted coffee beans for the most vibrant and delicious taste in your latte. Look for beans with a roast date within the past few weeks, and ideally, aim to use them within a month for optimal freshness.
Espresso Beans: When it comes to bean selection, choose varieties specifically labeled for espresso or espresso blends. These beans are roasted to highlight bold flavors and maintain a balanced acidity, making them the perfect choice for crafting a complex and satisfying latte experience.
Grind Size Matters: Invest in a burr grinder for consistent results. Grinding your coffee beans just before brewing is crucial to preserve freshness and unlock their full flavor potential. Remember, for espresso, a fine grind size is essential for optimal extraction and a rich, flavorful shot.
Step-by-Step Guide to Making a Latte: Your Latte Journey Begins

Now that you’re armed with the knowledge of essential ingredients and equipment, let’s embark on the exciting journey of crafting your very own latte! Here’s a detailed breakdown of the process, from pulling a perfect espresso shot to achieving velvety microfoam and creating a beautiful presentation (if you’re feeling fancy!).
Preparing the Espresso Shot: The Heart of the Latte
Grinding and Tamping: The dance begins with grinding your coffee beans to a fine consistency specifically suited for espresso. We highly recommend investing in a burr grinder for consistent results. Once ground, transfer the coffee to your portafilter and tamp it down firmly and evenly using a tamper. Think of it as creating a level and compact coffee puck for optimal water flow during extraction. Aim for consistent pressure distribution to ensure even extraction throughout the grounds.
Extracting the Espresso: With a practiced hand, insert the portafilter into the espresso machine’s group head and initiate the extraction process. The ideal extraction time is around 25-30 seconds, during which you should aim to extract roughly 1-2 ounces of espresso. A beautiful layer of crema (the reddish-brown foam on top) should grace your espresso shot – a sign of a successful extraction.
If your crema is lacking or the extraction time falls short, try adjusting the grind size (finer) or tamping pressure (firmer). Conversely, if the extraction is too fast (less than 25 seconds) or the crema has a burnt appearance, adjust the grind size (coarser) or tamping pressure (lighter). Remember, achieving a balanced and flavorful shot might take some practice, so don’t be discouraged by a few initial attempts!
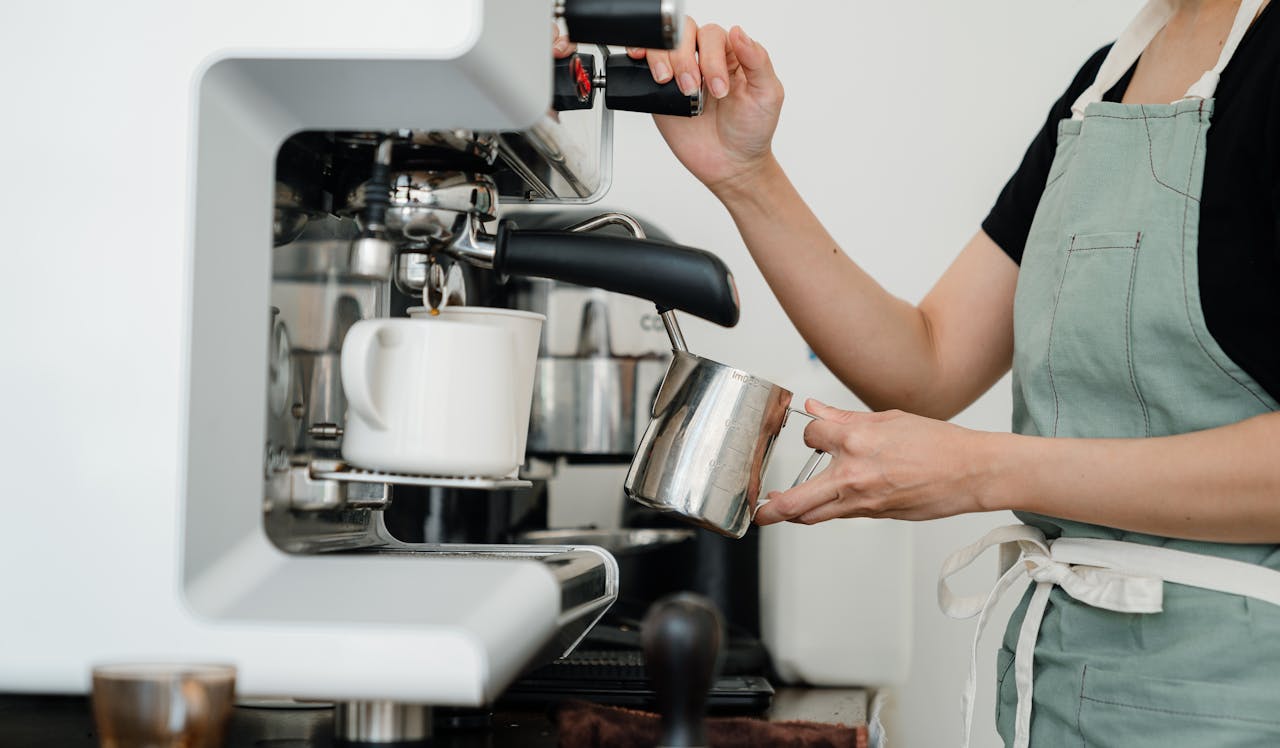
Frothing the Milk: Mastering the Art of Microfoam
Proper Technique for Creamy Perfection: Fill a stainless steel pitcher with cold milk, ensuring it’s no more than half full. This allows room for expansion during frothing. Insert the steam wand just below the surface of the milk and turn on the steam. Tilt the pitcher at an angle and gently swirl it to create a whirlpool effect. This helps evenly distribute heat and create the magical microfoam we desire. As the milk froths and expands, gradually lower the pitcher to maintain the steam wand just below the surface until the desired temperature (around 140-150°F) is reached.
Avoiding Common Mistakes: Be mindful of overheating the milk, which can result in a burnt taste that nobody enjoys. Pay close attention to the sound and texture of the milk as you steam it. Ideally, you’ll hear a soft hissing sound and achieve a velvety, smooth texture with tiny, uniform bubbles (microfoam) – a far cry from large, coarse bubbles. To avoid introducing these unwanted big bubbles, keep the steam wand positioned correctly and move it slowly as you froth the milk.
Pouring and Assembling the Latte
Layering the Espresso and Milk: With your perfectly extracted espresso shot and luxuriously frothed milk ready, it’s time to assemble your latte masterpiece.
Start by pouring the espresso shot into a preheated cup ( A warm cup makes a big difference in maintaining the ideal serving temperature). Then, slowly pour the frothed milk over the espresso, holding back the foam with a spoon for controlled pouring. Aim for an even distribution of milk and foam for a balanced latte.
Creating Latte Art (Optional): Feeling artistic? With a little practice, you can use the milk foam to create beautiful designs on the surface of your latte. Techniques like pouring in a circular motion or using a toothpick to manipulate the foam can help you create intricate patterns like hearts, rosettas, or tulips. While latte art might take some time to master, it adds a delightful touch of personalization to your coffee creation.
Tips for Success: Mastering Your Latte Craft
Here are some additional tips to help you become a latte-making pro:
Experiment with Ratios: Don’t be afraid to adjust the ratio of espresso to milk to suit your taste preference. A classic latte typically uses a 1:3 ratio (one part espresso to three parts milk), but some prefer a stronger coffee flavor (less milk) or a creamier latte (more milk). Find your personal sweet spot!
Grind Size and Tamping Pressure: Fine-tuning your espresso-making process involves experimenting with grind size and tamping pressure. Remember, a finer grind and firmer tamp generally lead to a slower extraction and a more intense espresso shot. Conversely, a coarser grind and lighter tamp result in a faster extraction and a lighter-bodied espresso. As you experiment, taste your espresso shots and adjust accordingly to achieve a balanced and flavorful base for your latte.
Practice Makes Perfect: Creating the perfect latte takes time and practice. Don’t get discouraged if your initial attempts aren’t quite Instagram-worthy. Keep practicing and refining your technique with each attempt, you’ll get closer to latte mastery.
Troubleshooting Common Latte Issues: Brewing Like a Barista

Even the most experienced latte enthusiasts encounter occasional challenges. Here’s a breakdown of common issues you might face, along with solutions to get you back on track to latte bliss:
Weak or Watery Latte
- Cause: This could be due to a weak espresso shot or using too much milk.
- Solution- Espresso: Ensure proper extraction. Aim for a balanced shot around 25-30 seconds, with a rich crema on top. Adjust grind size (finer) or tamping pressure (firmer) if needed.
- Milk: Reduce the amount of milk you use or try a higher ratio of espresso to milk (e.g., 1:2 instead of 1:3).
Problem 2: Bitter Latte
Cause: Over-extraction of the espresso shot is the likely culprit.
- Solution-Espresso: Shorten the extraction time. Aim for 25-30 seconds.
- Grind Size: Adjust the grind size to a coarser setting to allow water to flow through the coffee grounds more slowly, preventing over-extraction.
- Tamping Pressure: Experiment with a lighter tamp to create a looser coffee puck for better water flow.
Problem 3: Burnt Latte
Cause: Overheating the milk during the frothing process.
- Solution – Frothing Technique: Pay attention to the milk temperature. Aim for 140-150°F (60-65°C). Stop steaming once the desired temperature is reached.
- Steam Wand Placement: Ensure the steam wand tip is just below the milk surface to create microfoam without scalding the milk.
Problem 4: Lack of Microfoam
Cause: Improper frothing technique or using the wrong milk type.
- Solution:Frothing Technique: Ensure the steam wand tip is positioned just below the milk surface. Introduce air during the initial stage of frothing to create small bubbles. Submerge the steam wand deeper into the milk as it expands to create a smooth texture.
- Milk Type: Whole milk is generally considered the easiest to froth due to its higher fat content. However, with proper technique, alternative milk options like soy milk or oat milk can also be frothed.
Problem 5: Inconsistent Latte Art
- Cause: Latte art requires practice and precise milk pouring technique.
- Solution-Practice: The more you practice pouring technique, the more consistent your latte art will become. There are many online tutorials and resources available to help you master the art of latte art.
- Milk Consistency: Ensure you have achieved proper microfoam with tiny, uniform bubbles for optimal pouring control.
Beyond the Basics: Personalizing Your Latte Journey
The beauty of making lattes at home lies in its endless possibilities for customization. Here are some ways to add your own unique touch:
Flavor Exploration: Go beyond the traditional plain latte and explore a world of flavors! Experiment with flavored syrups like vanilla, caramel, hazelnut, or even try spices like cinnamon or nutmeg for a warm and inviting touch. Natural sweeteners like honey or maple syrup can be used for a healthier alternative to sugar syrups.
Alternative Milk Options: For those with dietary restrictions or preferences, explore the world of alternative milk options! Soy milk, almond milk, oat milk, and coconut milk are all viable choices for creating delicious lattes. Each milk type offers a slightly different taste and texture, so experiment to find your favorite. Remember, some alternative milks might require slightly different frothing techniques to achieve optimal microfoam.
Seasonal Twists: Embrace the seasons! During the colder months, consider adding a shot of pumpkin spice syrup or a sprinkle of cinnamon for a heartwarming twist. In the summer, try muddled fresh fruit or a splash of cold brew coffee for a refreshing take on the classic latte.
Final Thoughts
So, we’ve embarked on a delightful exploration of the world of lattes! We’ve delved into the essential ingredients: the rich espresso base, creamy milk, and optional flavorings. We’ve explored various equipment options, from high-tech espresso machines to ingenious at-home alternatives. We’ve even conquered the art of milk frothing, achieving the coveted microfoam for a truly luxurious latte experience. Finally, we’ve tackled common troubleshooting issues and equipped you with the knowledge to overcome any latte-making challenges.
Remember, crafting the perfect latte takes time and practice. Don’t be discouraged by initial hiccups. Embrace the journey of experimentation, fine-tuning your technique, and discovering the perfect ratio of espresso to milk that suits your taste. With each attempt, you’ll gain confidence and skill, eventually becoming a latte-making master in your own home!


